You may want to deploy your WebCenter Sites in a cloud (even a private one). This is a common requirement nowadays. We have done it a number of times, and I am sharing here my experience building this thing.
What you need is an automated installation, and you can do it using the Silent Installer part of Sites. In this post I describe the procedure using Apache Tomcat.
I assume you have an Oracle database already deployed so I won’t cover the details of installing Oracle.
Step 1. Download and unpack Apache Tomcat. First and before all you need to go in the Apache web site and download Tomcat
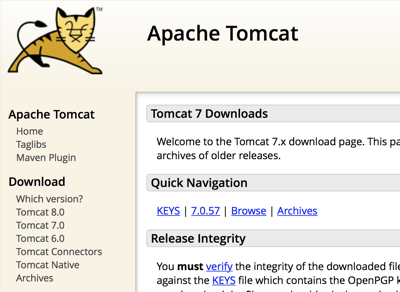
Once you downloaded it, unzip it in /opt/oracle/sites
Step 2. Dowload and unpack WebCenter Sites
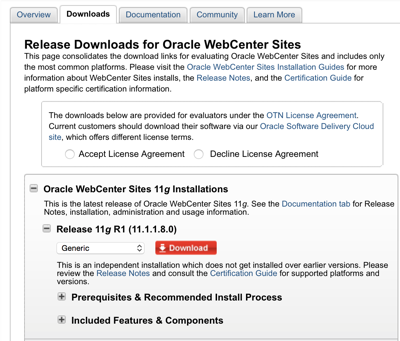
Now you need to go in the Oracle Web Site (or in the Oracle edeliver site) and download the WebCenter Sites. You have to unzip twice: fist unzip the downloaded file, then locate the WCS_Sites.zip and unzip it again under the /opt/oracle/sites folder.
Step 3. Install the ojdbc6.jar and the tools.jar.
Now you need the Oracle JDBC driver. Either get it from the Oracle distribution or download from the Oracle WebCenter Site.
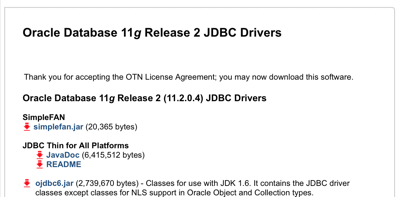
Once you downloaded it you need to place it under the apache-tomcat-xxx/lib folder in order to use it with Tomcat.
Important: you also need to put in the class path the javac compiler. So copy $JAVA_HOME/lib/tools.jar in apache-tomcat-xxx/lib
Let’s review if everything is fine. If you followed my directions you should have now this situation:
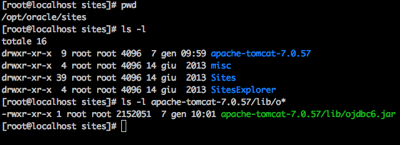
Check also that in the apache-tomcat-xxx/lib there are the files ojdbc.jar and the tools.jar.
Step 5. Configure Apache Tomcat.
Edit the /opt/apache-tomcat-xxx/bin/catalina.sh file and add at the beginning, after the #!/bin/bash line:
export JAVA_HOME=/usr/java/latest
export CATALINA_OPTS="-Xms512m -Xmx2048m -XX:MaxPermSize=192m -Dfile.encoding=UTF-8 -Dnet.sf.ehcache.enableShutdownHook=true -Djava.net.preferIPv4Stack=true -Duser.timezone=UTC"
Note: you may change the path of the jdk and the memory constraints to values more suitable to your system
Now, we are ready to configure the silent installer.
Step 6. configure the silent installer located Sites/install.ini and change it:
loadfile=/opt/oracle/sites/misc/silentinstaller/generic_omii.ini
then edit the file /opt/oracle/sites/misc/silentinstaller/generic_omii.ini and make the following changes:
sCgiPath=/cs/
CSInstallDirectory=/opt/oracle/sites/home
CSInstallSharedDirectory=/mnt/shared
CSInstallAppServerPath=/opt/oracle/sites/apache-tomcat-7.0.57
CSInstallDatabaseType=Oracle10
CSInstallDBDSN=csDataSource
CASHostName=localhost
CASPortNumber=8181
CASHostNameLocal=localhost
CASPortNumberLocal=8181
CASHostNameActual=localhost
CSInstallWebServerAddress=localhost
CSInstallWebServerPort=8181
Note 1: here I am using host localhost and port 8181 for test - you have to change to the actual hostname and port where the server will be available
Note 2: The default configuration will install all the examples. If you do not want then, change all the properties with “Sample” in the name to false.
Step 7: Create the database
Access to the database server, and create the user in the database. For oracle, access to the SQLPLUS command prompts as a dba and execute those statements:
SQL> create user CMS identified by CMS;
SQL> grant connect, resource to CMS;
Note: this is a very simplified example. In real world you will of course use a better password, and also you will allocate a table space for the user. But here I am only providing a sample.
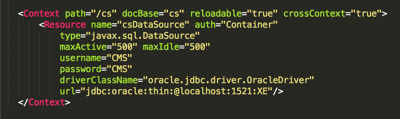
Step 8: Configure the database access in tomcat
For tomcat, you have to edit the apache-tomcat-xxx/conf/server.xml and locate the section:

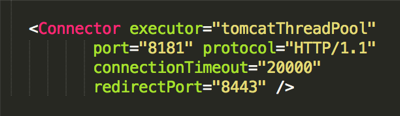
Since I am also installing in port 8181, you need to change the port tomcat listens. This is also in the server.xml: locate and change the Connect section accordingly this sample:
Note: this sample is referring to a local oracle-xe database. In real world you will put your own database parameters. Also, since the oracle-xe binds to port 8080, I had to change it. You may not need this change if you are using a database in another host.
Step 9: Extend the classpath in tomcat
Since CAS expects to find some files in the class path you need to extend the class path. So go in apache-tomcat-xxx/conf/catalina.properties and edit common-loader adding /opt/oracle/sites/home/bin to the class path, as in the following screenshot:

Now it is time to test if things will work executing an attended installation.
Before begin, copy this piece of code (a tester for data source connection) in /opt/oracle/sites/apache-tomcat-xxx/webpass/cs/testdb.jsp:
<%@ page import="javax.naming.*,javax.sql.*,java.sql.*"
%><%
Context initContext = new InitialContext();
Context envContext = (Context) initContext.lookup("java:comp/env");
DataSource ds = (DataSource) envContext.lookup("csDataSource");
Connection conn = ds.getConnection();
%>OK
Now, go in /opt/oracle/sites/Sites and type
sh csInstall.sh -silent
Then the automated installation will start. After a short while it will stop asking to start the application server:
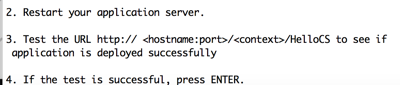
When you see this message, you are not yet done.
Now you need to open another terminal, go in /opt/oracle/sites/apache-tomcat-xxx/bin and type:
./catalina.sh run
This command will start tomcat in foreground (a good choice to test for errors in logs).
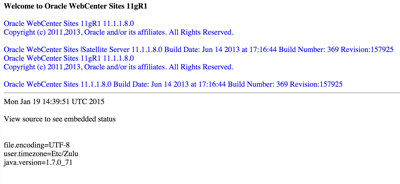
Now, first test the deployment has been performed properly calling with the browser:
http://localhost:8181/cs/HelloCS
You shold see the following message (o similar depending on the version you are installing):
Also, test database connectivity using the script I provided before.
Invoking
http://localhost:8181/cs/testdb.jsp
You should see simpy an OK message (no exceptions or other errors).
If things are ok, come back to the first terminal and press enter. Now the installer will create the database. You will see a number of commands executed. It can take a while
If everything is fine you should be greeted with a message:
Installation Finished Successfully
Congratulations!
Ok so far so good, but the automated installer is not good enough for a completely automated installation in the cloud, because it is attended. So we have to automate more in order to have everthing unattended.
The Sites installer stops when it completes the deployment of the war, asking the user to manually start the application server, wait for the application server to be up and running and then complete the installation when the user press a key.
So we need to write a script to perform the synchronization of the installer with the application server startup. I wrote such a script.
Here is the script auto.sh, split in pieces and commented.
It is expected to be placed in /opt/oracle/sites.
It requires the commands nc and wget to run. Those commands are not standard unix but very common and easily available.
The whole script is available as a gist here. This is the script inlined and commented.
#!/bin/bash
cd $(dirname $0)
BASE=$(pwd)
killall -9 java nc wget
It it a bash script, and it initializes changing to the directory where itself is placed; it kills any process that can be leftover of a precedent run.
echo "<<< deploying sites"
cd $BASE/Sites
rm out.log
touch out.log
nc -l 12345 | sh csInstall.sh -silent | tee out.log &
while ! tail -n 1 out.log | grep "press ENTER."
do sleep 1 ; echo ...deploying...
done
echo ">>> deploying sites"
After creating an empty log file, the Sites installer is launched in backgroud; the input is bound to a socket listening in port 12345 using the command nc while the output is sent to a log file.
The output in the log file is monitored in order to know when the installer complete its first run and stops, waiting for the application server to be started.
echo "<<< starting tomcat"
cd $BASE/apache-tomcat-*/bin
sh ./startup.sh
while ! wget -q -O- http://localhost:8181/cs/HelloCS | grep reason=Success
do echo "...starting..." ; sleep 1
done
echo ">>> started tomcat"
When we reach here, the installer has already deployed the war and it stopped with the “press ENTER” message.
Now, we can start the application server (tomcat) and then we wait until the application server is up and running.
We check that the application server is ready, looking for the “HelloCS” servlet and then checking for the “Success” string it contains.
echo "<<< installing sites"
cd $BASE/Sites
echo | nc localhost 12345
while ! tail -n 1 out.log | grep "Installation Finished Successfully"
do sleep 1 ; echo ...installing...
done
echo ">>> installed sites"
Now we can complete the work. Using the nc as a client we contact the nc listening as a server, and we can notify the installer it can complete its work “pressing enter” in a socket.
So the installation can be completed. We keep looking at the output of the installer until the message “Installation Finished Successfully” appears.
And that’s it.
This script works of only with Tomcat and it only deploys one instance. A real world installation will more likely require the deployment of multiple nodes, satellites and web server and the installation of custom components.
Sciabarra.com is experienced in automating larger and complex deployments, using puppet and ansible to pilot them, and build virtual machines for development with Vagrant. If you need help in this area do not hesitate to contact us.