03Jul2011
Problem: you need to know where an asset has been placed in the SitePlan.
Well, I have a similar situation. I designed a site in a such way that the css of an asset is picked looking at the category of the parent page.
This is not odd: when you navigate a site and reach a page with a given style (that changes according to the sections of the site), if you navigate to the detail , usually what you want is children keep the same style of the parent page.
So, basically I want to locate the parent page (or at least the first parent page, since I know the asset can be actually placed in more than one page).
However, that is the problem. What is the solution?
Note: I normally use the infamous parameter p to find the parent page. Well, I found the p is not the more appropriate way of implementing the concept "pick the style from the parent". There are way too many cases where assigning the p correctly is difficult.
So, how do you think you can find the parent? The simple solution is: enumerating all the pages, then check all the children until you find your asset. Well, I am sure you will agree if I say this solution is horrible, both performance wise and coding wise.
Fortunately I found is a better solution that I am posting here. This post is also a good opportunity to introduce an advanced Content Server techniques as well: the TreeManager.
The solution is basically looking into the table AssetRelationTree (that stores all the parent-children relationship) using the TreeManager (an internal server of ContentServerm accessible with a tag available in the tag libriry).
How to find the parent pages of a given asset
The problem, expressed in a more technical way, is: given an asset identified by his content id (stored in the "cid" variable), find the id of all the pages having that asset as a children. My Solution follows.
Step 1: locate a list of all the children assets in the AssetRelationTree with the TreeManager
<ics:treemanager>
  <ics:argument name="ftcmd" value="findnode"/>
  <ics:argument name="treename" value="AssetRelationTree"/>
  <ics:argument name="where" value="oid"/>
  <ics:argument name="oid" value='<%=ics.GetVar("cid")%>'/>
</ics:treemanager>
Step 2: extract parents using their node id (nid) and getparent
The returned list is only a list of the available relations.
Using the nid of such a relation you can look for the parent.
This is the code to retrieve the parents:
<ics:copylist from="AssetRelationTree"  to="List"/>
<ics:listloop listname="List">
  <ics:listget listname="List" fieldname="nid"  output="nid" />
  <ics:treemanager>
    <ics:argument name="ftcmd" value="getparent"/>
    <ics:argument name="treename" value="AssetRelationTree"/>
    <ics:argument name="node" value='<%=ics.GetVar("nid")%>'/>
  </ics:treemanager>
  <!-- now do something with the found id - see Step3 -->
</ics:listlooop>
Note that I copied the list from the first TreeManager call because another call to TreeManager will store the result always in the same AssetRelationTree list. Since I have to call the TreeManager again I am preventing the list to be overwritten and I am working on a copy.
Step 3: grab parents and do something with them.
Inside the loop in Step2, you will get all the parents of the asset.
You can retrive the id of a parent with
<ics:listget listname="AssetRelationTree" fieldname="oid" output="p"/>
also you can read the type with
<ics:listget listname="AssetRelationTree" fieldname="otype" output="ptype"/>
but it should be always "Page". Now you can do what you want with the parent (in my case, I was just using the retrieved parent to set the p parameter).
Bonus: how to do it all with a simple query
Well, you could retrieve the parent with this simple database query, tested with jumpstart and hypersonic:
select  otype,oid from AssetRelationTree where nid in
(select nparentid from AssetRelationTree where oid = 123456789)
where 123456789 is the cid of the asset you are looking for its parents.
However, as a general rule, I do not trust too much explicit queries because they are database dependent.
22Jun2011
I am deploying for a customer a shiny new content management site based on Fatwire; I am using some custom treetabs for easily access content.
I actually created a new Flex Family, let's say fpContent, then I created a new TreeTab displaying content and parent (let's say fp_C and fp_P), as follows:

Unfortunately, after I created some content, the result is not very pleasant:

The biggest problem for an end user is that the icons are not meaningful. It is impossible to distinguish containers (parents) from children. If you give a look to FirstSiteII, it doesn't have this problem, since parents are rendered as folders, and children as documents.
Fortunately, you can actually customize icons for the TreeTabs. Read on.
How to customize icons for TreeTabs
In your cs webapp folder, look inside c s/Xcelerate/OMTree/TreeImages/AssetTypes. You will see there, for each asset type rendered in a tree tab, a corresponding image named after the type plus a ".gif" extension.
So I tried this:
$ cp Product_P.gif fp_P.gif
$ cp Document_C.gif fp_C.gif
Then I restarted the browser (step required to clean the internal cache of the applet displaying the treetab), et voilà: you get your icons.

Nice, isn't it?
Differentiating icons for different Flex Definitions
After this result, I became bold and decided to use different icons for different contents. Actually, since I am using a FlexFamily, I want different icons for different Flex Definitions. This is a bit more trickier.
The biggest problem is that in a TreeTab you need to associate an icon to an asset type. But for a flex family, each content definitions is actually a subtype!!!
The trick is:
- create a new type
- associate the subtype to type when you create the asset of that type (with the New Start Menu Entry)
- finally, you can render the type in the treetab
So, let's do it, step by step.
Create a new type for the flex famiy
In the Admin tab there is the Flex Family Maker. It allows the creation of new types for each part of a flex family.
So select Add a New Flex Asset Type, called fpText as in the following snapshot:

Now, the fpText is a new type available for use. First, you have now to enable the type for the site.
Go to the Site tab, and enable the new available type fpText.
WARNING. You will be offered to automatically enable 2 start menu entries. DON'T DO THIS. Disable the check boxes and carry on.
Be careful here: the Start Menu entries created when you enable the type are generic, so you can associate to that type any subtype. This is NOT what you normally want.
Create the Start Menu
Now, go on the Start Menu section in the Admin tab, click on "New Start Menu", then associate to the type the wanted subtype.
This is the relevant screen that will allow you to select the correct Flex definition:

Render the content in the TreeTab
The reason of all of this work is because in a TreeTab you can only specify types.
Now, go on the TreeTab editor and add the type "fpText" to the types rendered by that TreeTab.

Finally you can go back to the AssetTypes folder of the applet (the one I mentioned before), and do:
$ cp Article.gif fpText.gif
Now, restart the browser and finally you can see a new shiny icon for the created new type (do you see the icon associated to "Test"?).

That's all.
19Jun2011
Just in case if you are wondering if FatPhone is dead... no, it is not. It is alive and kicking. In fact, I just released FatPhone 0.5 with support for a native iPhone app...
Why are you doing this?
Basically every enquiry I received about FatPhone since I released it, ended with questions like "where is the native app?" or "can I release it on the App Store?"
Well, FatPhone was not meant initially to be a native iPhone app, just an iPhone web site. After all, FatWire Content Server is a CMS!
However, the trend is towards native apps. Actually I already implemented an iPhone app that is using Fatwire Content Server as a backend.
So since I have the expertise, I made the decision to develop a native iphone application for Fatwire complementing FatPhone, and release it as an open source project as well.
In short, this is an announce that I am going to develop and release a native iphone application, that I will call FatPhoneApp
FatPhone will became the backend in FatWire for the upcoming FatPhoneApp.
Please note I have released so far only the FatPhone backend and a prototype iPhone app. Carry on reading, to know exactly what is available.
Evolving FatPhone
After considering my options, I decided that while using WEM could be a good option, I wanted to develop something available also for older version of FatWire, and possibly reuse the work done so far with FatPhone.
Since I need backend support on FatWire for the iPhone app, I decided to evolve the existing FatPhone to be such a backend. It turned out to be the more logical way to create the iPhone app.
So basically, to create content for the (upcoming) FatPhoneApp you still have to install and use FatPhone to create the content for the iPhone app. The iPhone rendering abilities of FatPhone are good to get an easy preview. Also the site will be still available in HTML format, not only as an iPhone app.
The content you create in FatPhone will be exported in JSON format (and in HTML format as well), that the app will read and use to render.
This is what I is already implemented in FatPhone v0.5, released today on GitHub.
A tour of FatPhone 0.5
After installation, you can still access for example to the Home Page using the site entry http://locahost:8080/cs/ContentServer?pagename=FatPhone and this is what you will get:

However, it is now available also the corresponding http://locahost:8080/cs/ContentServer?pagename=FatPhoneJs that will output the same page in Json format.
If you try to call this url with a browser this is what you will see (using a pretty printer for son, actually):

Navigating the normal FatPhone site you can see other pages and reach "text" pages, like this:

The corresponding Json for this page is instead:

What about the iPhone app?
Ok, you may say, "so far you implemented the backend code for the iPhone app. But what have you done of the actual app? I may need it..."
Well, actually I am working on it, but it is not yet ready. What I have done so far is the proof of concept code. Since it is not the complete iPhone app I need but only a demo, I released it in my "catch all" project FatGoodies. It is here.
If you download the code, build and launch it (while FatPhone is running as well) you will see the following in the iPhone simulator:

Basically, this iPhone app so far is able to connect to FatPhone, parse the specific Json generated by FatPhone 0.5 and render it in a table. It cannot yet navigate, so clicking on a row won't do anything.
Plans for FatPhoneApp
Once done, I will release the app in the upcoming project sciabarra/FatPhoneApp on GitHub. Also I will tag FatPhoneApp with the corresponding version number of FatPhone that generate the correct json. So you will know that FatPhoneApp v0.5 requires FatPhone v0.5, version v0.6 of the app requires version 0.6 of the backed and so on.
Now I am busy coding the FatPhoneApp. My plan for the release is to match with the current FatPhone feature set, then move the project forwad adding features both to FatPhone and FatPhoneApp.
Stay tuned.
06Jun2011
Some years ago I was using Fatclipse for the development of a large italian government web site. I liked Fatclipse because using it I was able to develop with Eclipse (with nice completion for JSP tag and Java method ). Fatclipse had also a very nice feature as well: immediate deployment of JSP. Just hitting "save" was enough to get the code immediately deployed on ContentServer.
When time passes, things change. Now I am developing a large UK government web site but Fatclipse is virtually dead (I was unable to run in with the latest 7.5.x Content Server) and since I work on a Mac I do not have the luxury of using ContentServer Explorer (well actually I want to avoid the punishment of having to use it :D, but this is another story). Furthermore the new CSDT (not yet tried acutally) requires he 7.6 (and I don't have it in my current project).
In the meanwhile I developed (for my own use) FatStart, that is basically a javascript installer for Content Server that can install elements; I extended to support XMLPost to upload the whole content model.
I developed FatStart as a packaging tool, to release a website called FatPhone. But I found to be useful as a development tools, so for my latest projects I dropped CSE (finally! :)) and I am developing using FatStart on a Mac… And I am happy.
Well, almost. FatStart gives me the freedom to develop on my Mac machine, allows code sharing with other developer using a version control system. But since it is a Javascript based installer, I had to "deploy" manually each template or cselement after a change, manually, with the browser. I just need to click the "install" button, but it still very tedious. Not very different from what you do with CSE, but tedious nonetheless. Every time I change something, before seeing the result I have to go on the Javascript installer, LOCATE the changed file, and deploy it.
It is a small step but annoying enough because it has to be done after every change, and I was missing the simplicity of Faclipse: just saving was enough to upload the changes code to FatWire… But suddenly I realized I could have also this with FatStart!
Making FatStart easier to use
I had just write some Java code that monitors jsp files for changes, and when it finds a changed file, upload it automatically. So one night, when I was too bored to write code for others, I decided to write code for myself and I extended FatStart adding this feature. Well, I had some code lurking in a forgotten folder that was already doing the upload of something to a CSElement.
Once completed, I commited, pushed on GitHub and it is now on FatStart v0.3 that I released today. You still have to install everything with FatStart as usual at the beginning. But now you can also launch the FatStart continuos deployer executing the script "deploy.bat" (or deploy.sh).
Well, the first time you have to change the config.prp to match your configuration, just in case you are not using a jumpstart in localhost listening in port 8080 or username and password are not standard.
The deployer will deploy all the elements. Note: it is not a complete deployer (although in the future could be), it just deploys ELEMENTS, not assets. So if you haven't created the Template and CSElements, you won't see it in you site. You can see the elements in the element catalog with CSE.
Also note that in current implementation it deploys ALL the jsp (files with extension .jspf) that it can find under folders CSElement and Template (FatStart deploys only the elements that are listed in the install.html). So be careful, you could overwrite something just dropping the wrong file in the directory.
After the first deployment, the deployer keeps running and monitor work directories. When it finds a changed file (a file whose last modification date has changed since its previous visit) it redeploys the file immediately.
Keeping the deployer up and running while you code has the net effect you can now edit the jsp with Eclipse and when you save it, within one second the file is deployed in ContentServer . An effect very similar to what I was having with FatClipse: just saving was enough to upload the file in Fatwire.
PS of course, if you don't want the extra step of having to clean the cache, remember to put the property "cs.nocache=true" in your futuretense.ini.
PPS. If you also have to code an URL assembler, a filter or other java code, add JRebel to your jump start kit, and you can have a complete no-deploy environment where you can change you Java code, your JSP code and get the result deployed with no intervention. Almost as luxurious as using PHP in the first place! Ok I am kidding, PHP is not that great as a programming language but it has some advantages... well it had I should say now...
30May2011
Content Server has a preview feature that, you may know, open the door to InSite.
It is actually an application to visually edit and compose pages.
It is a very interesting although... I do not use it too much  In my experience, users want from a CMS they just have to add the content, then the site is built more or less automatically.
So, in a large number of case I do no not use "InSite"; also following a best practice, I have a single layout. In this case, the whole preview window is redundant, and some users complains about it. Furthermore, it is sometimes annoying and confusing: often you forget to apply the default template to your assets, and you have to select template and wrapper to use. Users just wants to preview a page and see the end result.
Luckily, you can easily change the preview window. The key is the property xcelerate.previewurlpagename in futuretense_xcel.ini. Changing this property allows to call your own code to render the page. Let's do an example (real world code can be a bit more complex than this...).
Simplifying the preview window
I am showing here custom code to create a simplified preview window: when you click on the preview button, you will see directly the rendered page, with applied the standard layout and without any intermediate frame.
Note that this trick has many limitations and requires that a number of conditions are met (you are basically crippling Fatwire to remove unwanted features):
- first, your users are not requiring InSite, so all the web pages are rendered starting from a single layout
- second, you don't need to preview the site in different dates
- third, you have a single site in your content server (although this limitation can be easily overcome).
- fourth, you are allowed to change the file futuretense_xcel.ini or you can ask your system administrator to do so.
So let's write our "simple previewer". I will write the example referring to "FatPhone", my open source iPhone website for FatWire, but it can be applied to any site with straightforward modifications.
First step: you have to create a CSElement named fpSimplePreview with this code:
<%@ taglib prefix="cs" uri="futuretense_cs/ftcs1_0.tld"
%><%@ taglib prefix="render" uri="futuretense_cs/render.tld"
%><%@ taglib prefix="publication" uri="futuretense_cs/publication.tld"
%><cs:ftcs>
<publication:load
  name="theSite"
  objectid='<%=ics.GetVar("pubid")%>'/>
<publication:get
   name="theSite"
   field="name"
   output="site"/>
<render:calltemplate
   ttype='CSElement'
   tname='/fpLayout'
   tid='<%= ics.GetVar("eid") %>'
   site='<%= ics.GetVar("site") %>'
   c='<%=ics.GetVar("AssetType") %>'
   cid='<%=ics.GetVar("id") %>'
   slotname='layout'>
</render:calltemplate>
</cs:ftcs>
A couple of notes to this code: basically it is just a simple call:template to render the asset you are to previewing with a specific (fixed) layout.
Getting the publication name
In the call before, the only difficult part is retrieving the publication name, since the preview windows gets called with the publication id. We have "almost" all the parameters: the AssetType and his id (mapped as c and cid), but we do not have the site name, but only his numeric id; call:template instead requires the site name.
Luckily you can get the site name from his id using "publication" tags.
Note that those tags are, as far as I know, undocumented, although you can see his usage a lot if you give a look to the internals of Content Server (there are many others undocumented tags hidden around) , and his usage is straightforward and consistent with the other (documented) tags.
Nonetheless, using the publication:load/publication:get is the fastest way to get the name of the site.
Extending for different sites and layout
The call:template before is just an example. If you have also a wrapper page you will have to add the "wrapperpage" attribute. Also, if you have more than one site, with different layouts, you will have to change the code and decode the name of the template from the name of the site.
Best practices are using a layout with a different site prefix for each site. For example in a CS with FirstSiteII and FatPhone, you will have "FSIILayout" and "fpLayout"
However, my code ha no hint of what the site prefix is, so you may have to add code like this:
<%
   if(site.equals("FatPhone") layout="/fpLayout";
  else if(site.equals("FistSiteII")) layout ="/FSIILayout";
  else ...
 %>
Configuring SiteEntry
Second step: create a Site Entry. Now you have a CSElement doing the preview, that is not by default accessible in any way from the outside. But since the previewer gets called as a full page window you have to create a SiteEntry; see below:

Remember to make it uncached.
Third step is changing in futuretense_xcel.ini the property and restart content server.
xcelerate.previewurlpagename=fpSimplePreview
Now, if you did all the steps correctly, clicking on the preview link will simply open the asset with the given, fixed template.
Some users will be then happy they do not have any more to see a frame, then select the template and the wrapper page . And stop complaining.
23May2011
When you create a flex family, you will actually create a number of assets peculiar for flex families: Attributes, Parent and Content Definitions (collection of Attributes), Parents (defined by a Parent Definition), Contents (defined by a Content Definitions). But you also have Filters.
So, while other components are pretty well known, Filters are a bit... underused, maybe because their function is not completely obvious.
A filter, basically, is a post processor for your content that is executed when you save or update a flex asset.
A filter is useful for functions like converting documents (for example extracting html from a Word document), analyzing a file (for example extracting information like the size and the type), or for strange features a bit technical like "creating an attribute corresponding to a standard asset fields". This feature is actually important, I will tell more about this in a future post.
Actually Filters are really powerful when used appropriately. The biggest problem is usually you have to code a Java class to implement a filter. But there are a few very useful filters, that can be used easily with no coding since they are already available.
Using the Thumbnail Generator
One of the more interesting filter is the Thumbnail Generator that is included with FirstSiteII but can be easily used in your site.
Thumbnail Generator Filter is contained in the firstsite-filter.jar that is usually deployed with Fatwire. The filter however could not be immediately available if you do not have FirstSiteII enabled (and on a production system usually you should not...). So please check if you have that jar available in your site. If not, get it from any installation with the FirstSiteII installed.
The filter must be enabled as well, registering it in the Filters register. That is, adding a row in the database table Filter as in the following picture:

Note the ThumbnailCreator entry is mapped to "com.fatwire.firstsite.filter.Imaging".
Once you have done this, you can create a filter for your FlexFamily.
Creating the filter
Create a new filter for your flex family. Once created, in the list of available filters, your registered filter should show up, like in this image:

Now the filter must be configured. The work is not yet done.
Actually, the problem with the Thumbnail Generator filter is exactly how to configure it appropriately. It requires:
- the input attribute (that should be actually a blob attribute)
- the output attribute (also a blob)
- the size of the thumbnail
- 2 integer attributes that will store the size of the original image
- 2 integer attributes that will store the size of the thumbnail
- optionally also an attribute for the "aspect" ratio (that is: is the image vertical or horizontal)
All the attributes are mandatory and if you make a mistake, you are in trouble because you get a very unfriendly and uninformative error message. To debug the filter you have to enable the property
com.fatwire.logging.cs.firstsite.filter=TRACE
in the file
cs/WEB-INF/classess/common-logging.properties
Error messages from the log are informative enough and can help to fix the filter. You can always look to the filter definition in the FirstSiteII as an help:

Assuming you have configured it correctly, now you have to attach the filter to a content (or parent) definition. The filter requires the input attribute you specified. You do not have to add other attributes as they will be added by the filter when you save it. But the corresponding attributes must exist in the family.
Once you have done it, give a look to the following image for the result.

PS I noticed the Thumbnail Extractor is using A LOT of memory and has the tendency to generate out of memory. Fatwire Support may provide a better implementation of the thumbnail extractor filter.
19May2011
I just released FatStart v0.2.
New features:
- A new tabbed interfaces - the old single page interface was clumsy to navigate
- The ability to deploy each asset separately on the fly just clicking the install button.
See below for a screenshot of his new look.

08May2011
I am often in charge of stress testing Fatwire sites for my customers. The tool of the choice for those missions is the wonderful Apache JMeter. In this post I wrote a small tutorial about using it to stress test a Fatwire site.
Well, the site I am going to stress test now is just FirstSiteII, running in a JumpStartKit: not exactly a real-world case. Nonetheless I think the post is both instructive and useful, since the used techniques can be applied on real sites with no changes.
Preparing a test script
JMeter installation is easy: just download the tarball, unpack it and double click on the jmeter.sh or jmeter.bat launcher script.
Preparing a test is easy as well: you just navigate the site with JMeter configured as a ProxyServer: it will intercept all the requests and create a script that can be run by a large number of parallel threads.
You can create a test manually if you want, but recording browser behavior is faster. So, here is a step by step guide to record a test using a JMeter proxy server.
First, add a Thread group to the Test Plan (it will be the target of our recording): click right button on Test Plan, then Add | Threads (Users) | Thread Group.
Second, create in the workbench an HTTP proxy server (click right button on Workbench, then Add | Non-Test Elements | HTTP Mirror Server).
Now you have a target and proxy server, and you can configure the proxy as in following image:

We can see JMeter Listening in port 8080 as a Proxy Server, capturing all the requests and storing them in the Thread Group we created in the Test Plan. Note: change port if you have tomcat in port 8080! I usually have it in port 7001 but it depends on the version of your JumpStartKit.
The Thread Group is the entry point to manage requests that can be run as parallel threads, so it is vital for our stress test effort. We will see more on this later.
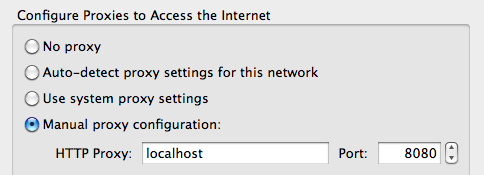
Third, you can configure a Firefox to use JMeter as a proxy server. You can use any other browser, it just happens I love FireFox. See the image below for the firefox configuration; with other browsers you mileage may vary.
Don't forget to remove "localhost" from the "No Proxy" field (that is enabled by default)!
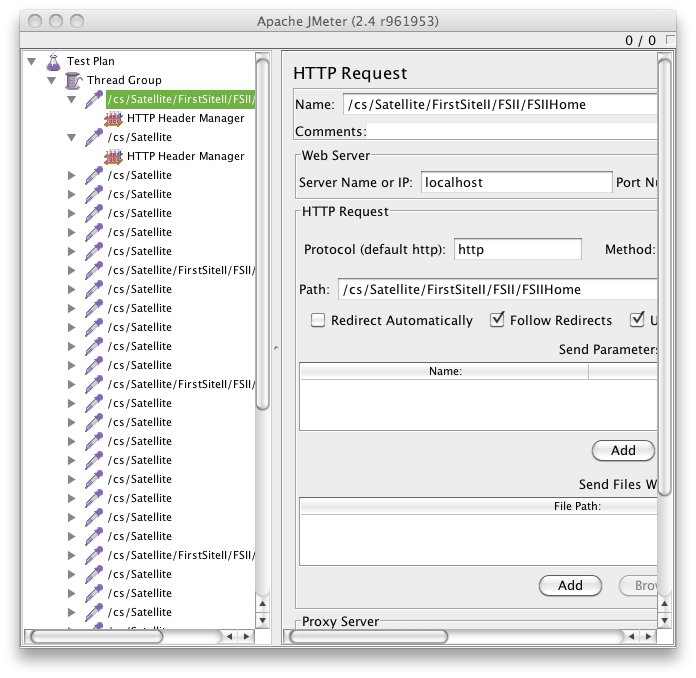
Ok, we are ready. You can navigate the site to record the test. I used First Site II and navigated all the pages in the top menu (without going into the detail page). The result is shown below:
Now, I am almost ready to run a test, but since grouping of results is based on the names of the pages, I decided to separate Blob requests from Page requests. Also I grouped Util call (small elements calls) from full Page requests.
Basically I went through all the recorded entries and I renamed the requests to Page, Blob and Util depending on the parameters.
Now I am ready to perform a stress test. Well, actually I am going to perform a number of stress test with different number of threads (that simulate the number of different users).
Stress Testing FirstSiteII
Basically, in a stress test you have to check what is going to happen when there are 1, 5, 10, 20, 100, 1000 users accessing your site at the same time. So what I did is to run the test script changing the number of threads. This is basically just changing a parameter in the Thread Group configuration.
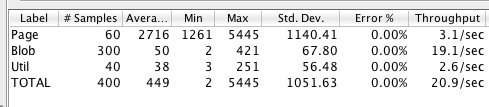
The first test run just with a single thread. It gives a measure of the absolute performance of the site. So I configured the Thread Group as follows:

Running with those parameters gives the following results:

Note that repeating the test usually it does not give EXACTLY the same results but normally they are similar.

Basically, this test says that with a single user, JumpStart can deliver more or less 1 full page per second and serve up to 7 requests per second (including images and sub elements of a page). Note that a page is served on average in a second.
Increasing Concurrency
A single user, accessing a site and opening pages like a mad is not anyway a real model of the real world usage. What we really need to know is what is going to happen where there are more users accessing the site at the same time. So I increased the number of concurrent users.
If we try with 5 users we get a better result:

An application server has normally some capacity to handle concurrent request that we are exploiting.
Note the throughput with some concurrent users is higher, 2 full pages and 15 requests served per second, but a single page on average takes 2 seconds to be delivered...
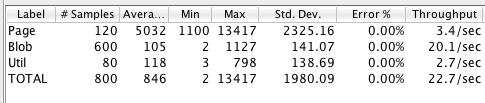
Let's test with 10 users now:
Better throughtput, 3 full pages per second and 2.5 seconds to get on average a full page. This is more or less the optimal result with a single site running on Fatwire Jump Start using Hypersonic SQL as database.
Note that we cannot add users and get better results forever however. With 20 users we don't improve anymore:
Throughput is the same as before (3 pages per second) but the average time to render a page is 5 second! The site is overloaded and is becoming slow.
Let's stress it a little bit more: 40 users!

Now, you get even less throughput than before, but you have to wait more to 10 seconds on average to get a page. If you try to navigate the site under stress the user experience is a slow site taking a lot of time to render pages.
Definitely, the site limit of our setup (completely unrealistic however) is around 10-15 users and you need to add Satellite Servers to horizontally scale the site.
02May2011
In a previous article about ensuring success of your FatWire project, I focused mostly good content model design . Today I am focusing on appropriate template design: why you should design your templates before coding them, and how.
Why you need good template design
Once you have a good content model, it is time to go for designing the template hierarchy.
Actually, you need a design for templates. Fatwire has some requirements on template naming built-in in the underlying logic of their tags. Here is a post that tries to explain the underlying ideas of Fatwire template coding. Basically, in a good design, content model types looks like classes, while templates looks like methods.
Well designed templates have a simple name, the code is short and straight forward, and it is very easy to read. Fatwire tags for templates are very verbose, with an overwhelming number of options. But using them in a consistently way will make your code readable.
You can check FatPhone template source code for some examples of how template should be named and coded. Those examples are not actually my personal opinion but they follow closely Fatwire best practices, examples and recommendations (I was a trainer for FatWire).
Actually, some so-called "Fatwire developer" (people that not only don't take any training classes but don't even bore of reading manuals) don't understand the design. Well, they don't even understand the meaning of many parameters (for example the parent, the context, even the appropriate use of c and cid), and write templates badly.
The biggest and more frequent mistake I have seen are templates with very complex Java coding , whose structure and naming coded shows clearly the code don't understand there is an underlying caching system.
For example, they store a parameter as an attribute and they read it in another template that can be actually cached!!! The result lead to unnecessary long code and repetitive code, full of tricks written in Java. And, most important, those templates do not cache properly.
So here there are my advices.
Do:
- Think before code. This should be done always. But it looks like that when it comes to implement a Fatwire site, since you have the psd, you have the html, you have the css, since you are late (as always) it looks like you just have to drop templates in Fatwire and you are done. Big mistake.
- Identify common parts. Look to each page and find out which parts are the same everywhere. They are good candidates to define standalone templates.
- So, checking carefully the html of your site, design a template hierarchy. Decide what is in the wrapper, in the layout, in the body, in the detail, for the link and so on. Be consistent.
- Write down this structure in paper, and be sure it matches the content model. Double check every template and be sure that is make sense. Remember: each template applies to a type so it is basically a method of a class.
- Use consistent meaningful naming. Each template must have a name that is simple and meaningful in context. So a name like Summary of an Article makes sense. Names like Template123 or LeftMenuForBoxWhenBreadcumpIsLongertThan2 do not.
- Remember: If you have a good design, your site will work. If you don't have, it won't.
Do not:
- Skip completely the template design phase and rush to code .
- Create a template for everything that render to a full html page.
- Split html according and give random names to each template according the mood of the moment.
- Ignore compositional dependencies and caching strategies until it is too late
Sadly, I have seen by far too many sites built this way.
The result normally is:
- an explosion of templates all different with inconsistent naming
- a lot of duplication of code
- different ways to do the same thing in inconsistent way (e.g. a breadcrump recoded everywhere)
- a site completely ummaintenable
- completely broken cache with devastatingly bad performances
- publishing completely broken since many dependencies are wrong
But I am sure it won't happen to you!
17Apr2011
Recently, in the independent Fatwire Developer Yahoo Group someone was asking how to get symbolic URL instead of numeric ones. Since I have a good experience writing URL Assemblers, I decided to write a blog post about improving the more commonly used URL Assembler: FistSiteII url assembler.
FirstSiteII url assember and its limits
When writing a custom URL Assembler for FatWire, the normal starting point is the FirsSiteII URL assembler that is provided by Fatwire as an example.
A common complaint about the FSIIAssembler is generated URLs looks like this:
http://localhost:8080/cs/Satellite/FirstSiteII/FSII/Product_C/123445678/12345679
They are certainly more friendly than the "c=Product_C&cid=12345678&p=12345679" generated by default (using the QueryAssembler, actually), but they are not yet very useful for SEO, since there meaningful informations required by search engines are still missing from the URL.
So I will show in this post how to improve the FirstSiteII URL assembler to replace numeric ids with symbolic names, in order to get URLs like this:

In an ideal world I can released the full changed code for the fixed URL Assember, but as far as I know this code is proprietary, so I cannot release it with my modifications. If someone from Fatwire is willing to give me the authorization, I will make all the code available.
In the meanwhile however, I wrote an helper class where the bulk of the code goes, and I can release it os github since it is all my code. The code is now part of the FatStart project, and it is available here: AssemblerHelper source code.
So basically, getting that class and following my instructions you should be able to easily duplicate my efforts, as long as you can get the FSIIAssember source code from Fatwire (and as a regular Fatwire customer, you can just ask the Support).
What AssemblerHelper does
The underlying idea of the AssemberHelper is replacing cids with asset names. So for example, instead of using the cid 1234568 for the page named FSIIProducts, in the url there will be exactly FSIIProducts. This replacement can be applied (or cannot applied, depending on your preferences) to the parameter p as well. I have done it but it is not strictly required.
AssemblerHelper provides 2 static methods:
- name2cid(c, cid)
- cid2name(c, name).
The "c" (the current asset type) is always required since you need to query for the "name" field by the "cid" in the "c" table. When you do the reverse, it is still a lookup in the "c" table for the id of a rows with the given "name".
Actually, uniqueness of names is no more enforced in all the versions of Fatwire, so there is the danger that a cid cannot be replaced with an UNIQUE name. So in the code there is a provision that when a name is not unique, no replacement is done (name2cid will return the numeric cid instead of the corresponding name).
The resulting name is also URL encoded, so if can be used in URLs. Furthermore, since there is the danger of SQLInjection, I added some code to detect quotes and to filter out dangerous URL to reduce the risk.
The decoding method (name2cid) will translate a symbolic name back in as a numeric c, searching for the id of an asset of the given type with that name. The method will take care of the url decoding as well.
Adding the encoding to the FSIIAssembler
Once you have the AssemblerHelper code, you got the FSIIAssembler code, there are only a couple of modification required in order to use my AssemblerHelper.
In the getPath method the url is built concatenating some elements. The current cid is stored in data.cid, the current p is stored in data.p, and current c is stored in data.c
Locate the code that builds the returned path (it is easy, as long as you can read Java) and replace references to data.cid with AssemblerHelper.cid2name(data.c, data.cid) (you need an"import com.sciabarra.fatwire.*" in your source code as well).
If you want to replace also the ∫with a simbolic name, you have to add also AssemblerHelper.cid2name("Page", data.p).
That is all for the encoding.
Adding the decoding to the Wrapper Page
Fatwire actually do the decoding in the SatelliteServer. Since the decoding requires access to the database, it cannot be performed on remote Satellites. For this reason, the actual decoding of the name back into a cid is performed in the wrapper page.
However, before adding the decoding in the wrapper page, an additional modifications must be done in the FSIIAssembler. There is a check that cid and the p are actually numeric in valueOf method of the inner class FSIIAssemblyData. Since now the cid and p can be string, that check must be removed. So, just locate the exception surronding the Long.valueOf(cid) and comment it out. Do this also for the Long.valueOf(p) if you have replaced also the p with a symbolic name. That is all for the URL assembler.
Now it is time to add the conversion from the name to an id in the WrapperPage. Open the FSIIWrapper CSElement and look for the render:satellitepage tag. Replace arguments
<render:argument name="cid" value="<%=ics.GetVar("cid")%>"/>
<render:argument name="p" value="<%=ics.GetVar("p")%>"/>
with
<render:argument name="cid" value="<%=
com.sciabarra.fatwire.AssemblerHelper.name2cid(ics.GetVar("c"),ics.GetVar("cid"))%>"/>
<render:argument name="p" value="<%=
com.sciabarra.fatwire.AssemblerHelper.name2cid("Page",ics.GetVar("p"))%>"/>
And now you are done.
Notes on performance
This solution is a potential performance killer since it performs a query for each URL requests. Fatwire has a ResultSet cache, so this problem could be not an issue, but if it is (maybe because there are too many different requests so the query cache cannot cache enough result sets) my suggestion is to add an additional caching level, storing name2cid mapping in an HashMap. I would use a WeakHashMap (so memory won't be an issue) and store the hash map in the application context, but I have not tried this solution so far. It is left as an exercise for the reader...